How I Learned to Stop Worrying and Test My Flow

darthvadertestingDo you write Flows? If so, congratulations, you’re a developer. No no, you are. You’re developing software, just with a declarative interface, so yes, you’re a developer. And what does every developer have to do, even though they hate it?

Test. Test. Test.

Once you’re a developer, you’re not exempt any more! Welcome to the development world. Yes, we hate testing. We like to think our Flow is just going to work the first time, but in all of the 30+ flows I have written in my time, I can only say that I am just lucky enough to have gotten away with it once. Seriously, that’s like a 3% chance.

Even then, I played it safe, and verified that it was going to work right by testing it first. You will save yourself SO much time and frustration by testing before deploying.

Flow is a unique beast, though, and there’s not a lot of documentation out there on how to test your stuff. By and large, we’re left wondering just what we should do to actually test. There’s some obvious things, but then the only truly obvious route is to actually deploy in order to test, and that’s not always a good option.

So without any further ado, here are some of the methods and guidelines I have come up with for testing my Flows.

1. Sandbox Sandbox Sandbox

sandboxes

I know sandboxes seem like a waste. I know the concept is alien to some of us. But really, do it. DO IT. This is especially important for Flow Triggers, which, I can attest to personally, can cause stupendous failures.

When a Visual Flow crashes, it only affects the person trying to run the flow, and usually just throws an error. When a Flow Trigger crashes, that crash can affect ANYONE who is trying to do their work. Even if you have “Administrators run the latest flow version” turned on, you can still have problems if you haven’t activated any versions. So trust me when I say, Sandboxes are more important than ever before for Flow.

2. Always Fault

There’s nothing that your users hate more than a cryptic error. Seeing

An unhandled fault has occurred in this flow. An unhandled fault has occurred while processing the flow. Please contact your system administrator for more information.

is the surest way to frustrate and confuse, not to mention driving your users AWAY from using your blood-sweat-and-tears Flow. Nobody wants to use a tool they don’t understand, so quite simply, they won’t.

So how do we avoid this? We add Faults.

Screen Shot 2014-05-06 at 13.54.13

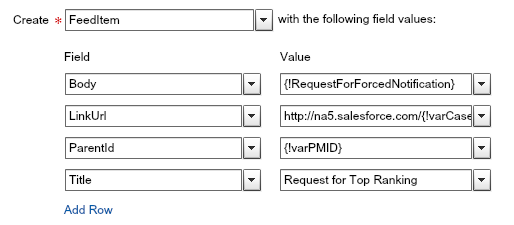
Every Create, Update, Lookup, or Delete.

Any Record or Fast Element can have a Fault element attached to it, and your best practice is to ensure that every Record or Fast Element has a Fault element attached to it. A Fault element can be made by creating any element and drawing an arrow to it from your Record or Fast Element AFTER they already have an arrow pointing to another element. If the Flow errors on that source element, it will then perform whatever is in your Fault, rather than showing that “unhandled fault”. That’s what unhandled means; it means that you haven’t defined what should happen when a fault happens.

A fault can contain a message to the user, it can create records, it can even send an email if you use the Email Plugin. Anything Flow can do, you can make happen from a Fault, so this is invaluable not only to your users, but also to your debugging and testing. Having a screen that tells you what your variables’ values are AT the point of failure is essential.

Another quick tip: if you want your fault to do things AND present a screen (I almost always have mine send an email and then show a customized error in a screen), do the email or other things first, THEN do your screen. If a user gets an error message screen, they are a lot more likely to exit the screen instead of clicking the Next or Finish button, and if they don’t click that button, it WON’T fire your email or other actions.

3. Gotta Test ‘Em All

portalmon-shirt

This is another drudgery chore, but as admins I cannot stress enough that you have to personally try out your functionality. Don’t just try your flow while logged in as you; try it while logged in as the actual users who will use it. Try each choice option you present in your screens, or at least a sample of them, if there are too many to test. Make sure you run your Flow through every possible decision path, to be sure each decision path actually works.

Also, try your flow while logged in as the actual users who will use it. What, I already said that? Well, good, it needs to be said again. It’s so easy to forget to do, because you have to do it in a sandbox in order to do it safely, but it’s one of the most important things you can possibly do in your testing.

So How Do I Test Exactly?

The Temporary Assign Element Method

Screen Shot 2014-05-06 at 13.58.00

The Run button is a great option in the Flow Designer, but unfortunately it’s fairly useless without some setup. Almost every flow needs some data passed to it, and that Run button cannot pass any of that data. So how do we make it useful again?

Create an Assign element BEFORE the start of your Flow, and in it, assign some sample data to the variables that would usually have been set. Draw its arrow going to the start of your Flow, and then make the Assign element the actual starting element.

You can now use the Run button with impunity! This makes testing a lot faster when you don’t have to click around to get to your Flow, and it has the additional bonus of being able to test your Flow (at least, the testing that you do while logged in as you) without making it live for everyone. It’s a great way to do quick proof-of-concept testing as well.

Please keep in mind this doesn’t work on any flow with sObject variables or collections at this time.

The Screen Debug Method

Screen Shot 2014-05-06 at 14.06.44

This ties in directly with bullet point 2 above. If, in your testing, you hit an error or bug or other unexpected result, being able to insert a temporary Screen that just repeats what the variables or Screen Choice values are at any given point can be the key to unlocking the mystery behind your dysfunctional flow. There is no reason this cannot be done at any time; you can insert this into the middle of your flow’s track without having to use a FAULT path, so you’re seeing things as they happen, even before the error comes down.

Of course, because this method uses Screens, it is incompatible with Flow Trigger flows. Bummer.

[Edit: Removed the Flow Debug object method. Turns out this has some pretty glaring issues with most faulting in Salesforce. Thus reiterates my overall point about being extremely thorough in your testing of, well, anything.]

Did you know…? Account Names

The character limit on the Account Name field is actually 255 characters, not the standard 80 found on custom objects. This is not stated in the UI, but can be found in documentation
(https://help.salesforce.com/apex/HTViewHelpDoc?id=account_fields.htm&language=en_US)

Just remember that if you use workflow to populate any custom object name fields with the Account Name, that any account with more than 80 characters will break your workflow! (I say this, because I’ve done it.)

So if this question appears on your Salesforce Certification exam, you will now know the answer! And knowing is… well, you know.

knowing-is-half-the-battle

Random Discovery – Record Type Fields in Formulas

If you’re like me, it’s sometimes easy to forget what options and services are available to you if you can’t see them. Case in point: being able to use Record Type fields in formulas.

This is a feature that was released only a year ago, but yesterday, I discovered that it’s not readily apparent EVERYwhere.

Here’s what the interface looks like when making a formula on a custom object:

CRRecordType

But here’s what it looks like when making a formula in Case:

caseNoRecordTypeName

Wait, what’s missing here? There’s no Record Type > ! And upon further research, I found it was not present in any of the Standard Objects I looked in: Cases, Accounts, Opps.

Does this mean that the functionality was not present in those Standard Objects? Breathe a sigh of relief, for the answer is, you CAN still use it. To test this, I manually typed in “RecordType.Name”, hit the Check Syntax button, and got the following result:

validatedRecordType

So there you have it. It WORKS, but it’s just not in the UI for Standard Objects. And frankly, it’s telling, regarding the overwhelming number of things we can do in Salesforce, the sheer scope of possibility, that only a year after release it’s so easy to forget that this feature was released.

Here are the values you can manually type into Standard Object formulas, validation rules, and workflow to reference Record Type information:

RecordType.Name
RecordType.NamespacePrefix
RecordType.Id (but avoid this one whenever possible!)
RecordType.DevName (I prefer using this one over RecordType.Name, because this is the API name and as a result, is in far less danger of being changed by a well-meaning admin.)

Post to Chatter from Visual Workflow

tennyson

One of the most marvelous aspects of Visual Workflow is the fact that you can hit any API-based object from it. If it’s listed here, you can generally read, create or delete from it (with a few exceptions on protected objects, of course). It’s a surprising amount of power, once you dive into it. Today we’ll look at one of those possibilities: making Chatter posts from Flow. If you’re hip on upcoming events, you’ll know that the Salesforce product team is working on adding a new regular workflow action to post to Chatter (SAFE HARBOR!), but until that day comes, welcome to your one-and-only method of Chatter automation.

Well, you could always code something in Apex. And I suppose you could find something on AppExchange. Ok, it’s not your ONLY solution but it’s a pretty damn good one.

The key to creating a Chatter post is using the object “FeedItem”. “FeedPost” sounds more applicable, but it’s actually counter-intuitive; FeedItem is a newer object that replaced FeedPost (I believe this was done to enable other types of posts, like polls and dashboard components).

You can use the Create Record element, and only a few fields are required for your post.

feeditem

The field “Body” is absolutely necessary. I highly recommend making a Text Template in your Flow and calling it for your Body. If your post is super-short, though, you can just type in what you like.

ParentId is also necessary; this is the Salesforce ID of the record that this Chatter post should be on. You can make it a User ID to post it on their wall, but best practice is to place it on any object that has Chatter Feed turned on. (You may also see a field called RelatedRecordId; this is actually a field only used when attaching Content to a Chatter post!)

LinkUrl and Title are optional; they are used if you wish to post link in your Chatter post. You can type in both of these fields manually, and you can even merge in Flow variables by manually typing in {!variableName}, as shown above.

There are other fields, and some of them may seem necessary, like Type. However, these fields are set to contain default values, and almost always, those default values are what you will want to use, so really the above fields are all you need to worry about.

Other Considerations

  • At this time it is not possible to do @ mentions in your posts. Sad face.
  • Historically, you can use topics, albeit with limitations. If you put a # sign in your post body, the word immediately following it will be marked as a topic. However, it’ll just use one word, so you can’t do topics with spaces in them. I have not tested this in a Spring 14 setup, though, so I am unsure how this will work with the new Topics system.
  • BEWARE THE SPAM. If the Flow that makes a Chatter post is used frequently throughout the day, this will make a LOT of Chatter posts. This can be a good thing, but it can also be an extremely bad thing. If one use uses the Flow 10 times a day, those 10 posts are going to show up in the digests of every user that is following the user. If the follower is also following someone else who is doing the same thing, they now have 20 posts in their digests. If there was only 1 or 2 posts that actually contain something the user needs to see, and they get mixed in with the 10-20 other posts that, frankly, become very samey and ‘boy-who-cried-wolf’ after weeks or months of repetition, the Chatter digests will come to be ignored. I HAVE SEEN THIS FIRSTHAND. Nothing will kill Chatter usage and adoption like Chatter spam.

There you have it! Chatter post automation from Flows! Easy peasy! Now, because there has not been nearly enough levity in this blog post… narwhals.

Flow Tools – The Best Plug-ins To Date, by Rajaram

A while back, the product manager for Flow, Varadarajan Rajaram, published on GitHub a series of Flow-based plug-ins and tools to make life easier using Flow. Truly, they were some of the best plug-ins ever made to facilitate Flow in Salesforce. Why they never made it into Salesforce’s core Flow offering, I’ll never know.

Now, however, Rajaram is no longer with Salesforce, and the GitHub page has been taken down. Thankfully, I did manage to download some of the source code, so I am making it available to the public here. It’s in the form of Apex classes and plug-ins, so you’ll likely have to use something like Eclipse and the good ol’ fashioned copy-paste to get them into your system. ANT can also be used, if you know those ropes.

I repeat: All of the following content is Varadarajan Rajaram’s, and not mine. I did not write any of this; I am just making it available in his stead.

And as always, install into your sandbox first!

FlowPicklistSync – Allows you to use existing Picklist definitions without re-creating them as Choices in Flow.

FlowShowAsYouGo – Shows how to create a dynamic Visualforce page that can get information from the flow as the flow progresses.

FlowPluginPack – Contains some of the plugins found in the AppExchange pack, plus a couple others: Submit for Approval, and Zip Code Verification.